A reinforced German infantry kampfgruppe of the 1058th Regiment, 91st Luftlande Division has taken up positions holding the town of Cauquigny and the causeway leading to La Fere. The low lying lands have been flooded to prevent gliders from landing in the area. Unfortunately for the Hauptman in charge of the garrison, a reinforced American Paratrooper company has landed in the area with orders to seize the town and the causeway in advance of the 4th Infantry Division landing on UTAH beach less than 10 miles to the east.
Seize and Hold Battle. The Germans used the “Across the Volga” for their artillery (or would have if it had ever showed up . . .). Since we were playing on the entire 8’ x 6’ table, we allowed the attacking force 8 turns to achieve the objectives instead of the normal 6 turns on a 4’ x 6’ playing surface. Night broke as normal, though in retrospect I think we should have waited until turn 4 to start checking.
Germans: (all Confident Trained unless otherwise noted per the latest Battlefront article on German Infantry Divisions in Normandy. They also get 1960 points for a 1500 battle).
- Company HQ (II Battalion, 1057th Regiment, 91st Luftlande Division).
- 3 Infantry Platoons Full Strength and with Panzerfaust
- Engineer Platoon with two sections
- Scout platoon with Assault Rifles
- MG Platoon
- Mortar platoon with 4 81 mm mortars
- Infantry gun platoon with 2 75mm leIG 18 guns
- Sniper
- Assault Gun Platoon with 3 StuG IIIs (191 Panzerjager Abteilung) (Confident Veterans)
- Artillery Battery with 4 105mm GebH40 Mountain Guns (191 Mountain Artillerie Regiment)
- Panzer Platoon with 1 H-39 and 4 R-35 tanks (100. Panzer Ausbildungs und Ersatz Abteilung). I guessed this platoon would be ~ 150 points. I built this unit up using Battle Honors tanks and while they are nice models, I think they are too small in comparison to the Battlefront ones. On the other hand, they do represent discarded French tanks that the Germans were using to train on before they got more manly panzers. Unfortunately for this unit, the Americans showed up first.
Americans: (82nd Airborne Division, all Fearless Veterans).
- Company HQ with three bazooka stands
- 3 Infantry Platoons
- Mortar Platoon
- ATG Platoon with 57mm guns (Confident Trained – They are Glider troops).
- Pack Howitzer Battery with 4 75 mm pack howitzers
Objectives: To make this a bit historical, we selected the Merderet Bridge at La Fere and the center of the town at Cauquigny. This appears to be close to what the 82nd Airborne Division actually tried to achieve, so I feel we weren’t too far off.

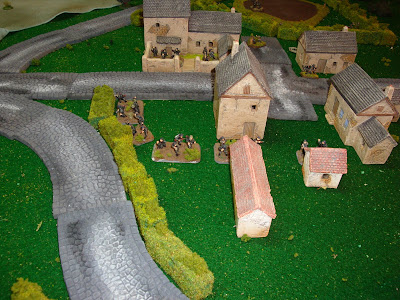
The terrain at the Cauquigny causeway. The blue area represents the lowlying area that the Germans had flooded to prevent Allied gliders from landing.
 Objective #1: The center of the village of Cauquigny.

Objective #2: The bridge at la Fere.
Deployment: I looked at the map from the board game “Against All Odds” for terrain features and interpolated from there. The area here appeared to be more open than the normal Normandy bocage, so there are some open areas. The flooded area was impassable for everyone, which tends to split the area up into two distinct sections.
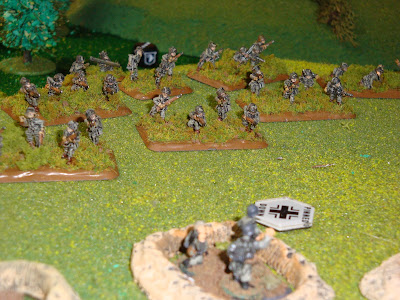
The Germans deployed their HQ, 1st infantry zug, the 75mm infantry gun platoon and the sniper in the town of Cauquigny. The 81 mm mortar platoon set up in the field just south of Cauquigny as there was no room left in the town. The 2nd infantry zug deployed around the manor house near the bridge, while the MG platoon set up in high ground just east of the bridge. All forces start the game pinned. No one starts the game entrenched. The plan is to pin the paras with my indirect fire weapons and infantry, and then mop up with the armor.

German deployment.
The Americans selected the north edge of the table as their deployment zone.
TURN 1
US: The Americans roll for reserves and get their mortar platoon on turn 1. They deploy 1 infantry platoon north of Cauquigny and push south towards the town in the pitch dark. On the other side of the flooded lowlands, they deploy the HQ and two infantry platoons. The HQ deals out an extra bazooka team to each of the infantry platoons.

Here come the Americans.
Germans: Achtung! Falschrimjagers are in the area, Herr Hauptman! The HQ and infantry zug in Cauquigny unpin, as do the MG platoon on the hill near the bridge. The MGs dig in. As it is night, not much else can be done. Division HQ cannot be reached. Perhaps Herr General Falley is in Rennes for the korps kriegspiel . . .
 MG platoon digs in and awaits the inevitable assault. MG42s are great!
TURN 2
US: The pack howitzer battery shows up in the NE corner next to the mortars to assist the attack toward the bridge. The two infantry platoons continue to move down south towards the bridge, one along the road and one in the light forest of the high ground. On the other side of the big swamp, the last infantry platoon moves toward the town center, shielded by the dark and various hedgerows.

US reinforcements: Pack howitzers arrive to provide HE fire.
 US 2nd Paratrooper Infantry platoon infiltrates German positions north of Cauquigny.
 US 1st Paratrooper Infantry Platoon double times towards the bridge at la Fere.
Germans: The infantry zug at the manor house unpins and starts to reposition to get better fields of fire to the north. Everyone is out of range or out of the line of sight. In Cauquigny, the mortars unpin. Division HQ is still out of town. Or perhaps under attack? Everyone is uneasy. That air raid at St Mere Eglise was particularly unnerving. . .

German infantry deploys at the Manor house at La Fere bridge.
TURN 3
US: The two infantry platoons push toward the Germans on the La Fere side of the swamp. The 1st paratroop infantry platoon double-times it down the road, hidden by the dark. The 3rd paratroop infantry platoon has wound its way through the light woods along the high ground and begins to move toward the German MG platoon dug in up slope of the bridge. They shoot toward the MGs but do no damage. The 2nd paratroop infantry platoon on the Cauquigny side jumps the hedgerows at the northern end of the village and start to infiltrate towards the center. They shoot at the sniper holed up in one of the houses and kill him, to the German commander’s displeasure. The AT gun platoon shows up as reinforcements on the Cauquigny side of the board, and move along the back roads towards the town.
Germans: Ja, ja, falschrimjagers! Herr Hauptman finally gets through to HQ, which promises reinforcements, just not this turn. Great. In Cauquigny, the mortar platoon sends its FOs toward the village square where they can actually see something, and the 75mm infantry gun platoon finally unpins and moves toward the incoming US forces. The Germans in the town shoot at the Americans but do no damage. To the east, the MGs open fire on the paratroopers moving toward them and kill three stands, which is good, because there are ten left to go. The Germans roll for dawn and amazingly enough, it actually breaks. This is not good for the US player, as he is far from either objective, and I can now see him. Guttural German laughter ensues!
 Germans wake up and deploy to defend Cauquigny.
TURN 4
US: Charging MGs isn’t one of the tactics that are encouraged at Fort Benning, but sometimes you just have to say “Geronimo!” and go. The 3rd paratrooper platoon moves up toward the MGs on the hill. Small arms fire doesn’t kill any, but the mortars pin the MGs, diminishing the ensuing defensive fire which kills three US stands. Then it’s into the German positions. In the assault phase the paras kill the two closest German MG teams, but lose two more US stands in the counter attack phase before the Germans break off. Ouch. That’s five stands lost to kill only two German ones. Not a good exchange rate. The platoon has to take a morale check, and passes. The German commander is still happy, even though a pack howitzer barrage pins his other infantry zug at the bridge.
US 3rd Paratrooper Infantry Platoon charages MGs on the high ground west of the bridge.
Out west in Cauquigny the Americans shoot at the Germans in the houses and foxholes but do no damage. The AT guns continue to move towards a position where they might do any thing of value.
 US 2nd Paratrooper Infantry Platoon begins its assault on German positions in Cauquigny.
Germans: Finally, reinforcements! The battalion scout platoon show up using scattered reserves to the east on the road just to the south of the MG positions. They double-time it up to just on the other side of the hedgerow from the MGs. The MGs fire at the paratroopers on the hill, but with a low rate of fire from still being pinned, do no more damage. They decide to sit tight and await the next American assault as they know the scouts will avenge them. The infantry zug on the bridge doesn’t unpin (nor will it for the rest of the game!) and just sits there, noting the approaching Americans but unable to damage them with any accurate small arms fire.

German MG platoon is ready to repulse the US paratroopers!
 German scout platoon with assault rifles arrives to reinforce the left flank and kill any paratroopers that the MGs miss.
In Cauquigny, everyone shoots at the Americans and end up killing three teams, which is pretty good. I think I killed more US paratroopers in this one turn (8 stands) then I had ever done before. Wait until Herr General hears about this!
TURN 5
US: Call of Duty time! Even though they are under half strength, the power of a Fearless Veteran US paratrooper platoon should not be underestimated. Realizing that the choices are pretty limited, the paratroopers that had taken out two MG gun teams continue their attack. Their mortar and small arms fire does little damage, though the scout platoon is pinned by the falling mortar bombs. The five teams of the 3rd Paratrooper infantry platoon assault the reaming German MG stands. Defensive fire causes no damage, and in the assault phase two MG teams are killed. The Germans fail their morale check and the MG platoon routs from the scene. Oh well, one platoon down, a lot more to go. The Americans no go for broke and attempt a break through assault at the German scouts on the adjacent hedgerow. Defensive fire does no damage to the blood crazed Americans, who then assault and kill all five German stands. Gott in Himmel and other Teutonic curses! There goes my flank. The German infantry down at the bridge start to feel pretty alone, and they’re not even Ost troopen. An artillery barrage that kills two stands doesn’t help either. The other paratrooper infantry platoon moves up towards the bridge but small arms fire doesn’t do any damage.
 US paratroopers assault dug in MGs with assault rifle armed scouts in reserve. The Germans anticipate an easy victory.

Geronimo! Remember Pearl Harbor!

The MGs gone, the US 3rd Paratrooper Infantry Platoon assaults the scouts behind the hedgerow and destroy them all.
In Cauquigny, the 2nd paratrooper infantry platoon moves up towards the enemy positions and assaults the Germans in the northern edge of the town. They take out a 75mm infantry gun stand, but then the assault stalls. German defensive fire kills three stands and pins the platoon ending that assault attempt. The AT guns set up along the west side of the board.
 The firefight in Cauquigny continues . . .
Germans: So much for momentum. I lost two platoons and my left flank to a half strength US paratrooper platoon. Things are not going as planned. Luckily, reinforcements show up. An Assault Gun Platoon with three StuG IIIs show up on the corner near the threatened bridge at La Fere, as well as the less than elite tankers from 100. Panzer Ausbildungs und Ersatz Abteilung with 1 H-39 and 4 R-35 tanks. The StuGs double time it towards the bridge as things are getting dicey there. The lackluster appropriated French tanks try as well, causing the H-39 and an R-35 to break down. Great. That’s the last time I try that one. Desultory mortar and small arms fire area directed towards the Americans but no further damage is done.

The less than elite panzers from 100. Panzer Ausbildungs und Ersatz Abteilung arrive!
 The Confident Veteran StuG IIIs show up as well.
TURN 6
US: The paras in Cauquigny unpin and shoot at the Germans there but cause no damage. This firefight isn’t getting very far, but keeps the pressure on the Germans there. On the other side of the board, the mortars and howitzers keep the Germans at the bridge pinned. The 1st paratrooper infantry platoon moves toward the bridge and keeps the Germans there under fire, but doesn’t kill anyone as they move towards assault range. The remnants of the 3rd paratrooper infantry platoon move toward the German flank on the bridge positions, trying to get a higher individual award for the platoon commander.
 German 75mm infantry guns pound the Americans in Cauquigny.
Germans: More reinforcements arrive. The pioneer platoon arrives right near the US AT gun positions and another infantry zug shows up near the less than elite tankers of 100. Panzer Ausbildungs und Ersatz Abteilung. They push the bogged down tanks but can’t get them moving. The rest of the dilapidated French tanks move towards the causeway, but at a slower pace. The StuGs move towards the bridge, but can’t get there this turn. The pinned infantry at the bridge manage to kill two stands of the 1st Paratrooper infantry platoon, which is not bad. Just imagine what they could do if they ever managed to unpin. The Germans need to get reinforcements to the bridge as soon as possible as while the American attack in Cauquigny is stalling as German reinforcements mass there, there are only a few StuGs on the other side.
 German infantry give the broken down tanks of 100. Panzer Ausbildungs und Ersatz Abteilung a push, but German efficiency cannot mend the dilapadated French tanks.
TURN 7
US: The Americans in Cauquigny unpin and assault the Germans. Small arms fire kills one stand in the houses. Defensive fire kills the American bazooka stand but isn’t enough to stop the assault. The Americans kill two more German stands before the Germans break off and retreat to the next line of houses. A pioneer stand also gets shot at and killed as that platoon tries to close the action.

The firefight in Cauquigny keeps the pressure on the Germans.
Across the causeway, the 1st platoon is finally in assault range and they move up to hit the German positions at the manor house south of the bridge. Mortar and howitzer fire doesn’t do any damage, nor do small arms to the Germans. German defensive fire kills 2 paratrooper teams and pins the platoon, ending that assault attempt. The 3rd platoon on the hill shoots at the Germans but doesn’t hit anything. Not every turn is a Medal of Honor one.
 US 1st Paratrooper Infantry Platoon approaches the bridge but so do the Stugs.
German: The Americans are running out of steam while my reinforcements are finally getting to the scene of the action. The 105mm battery show up, or at least the FOs do. They are down in the corner near the bridge, but too far away to do anything. Rather unfortunate, really. The StuGs lumber up the hill and start shooting at the paratroopers, killing a team of the 1st paratrooper infantry platoon. Small arms fire kills another. More attrition for the Americans.
In Cauquigny, the pioneers advance and kill the platoon commander of the US AT gun platoon. The 3rd infantry zug and panzers advance toward the town. Mortar and small arms fire merely keep the Americans from moving any further south. As long as the StuGs and infantry at the bridge can hold, I think I have enough forces to cause the Americans to break. Really!

German pioneers kill the US commander of the AT gun platoon.
TURN 8
US: In Cauquigny, the AT gun platoon scatters out of the line of fire, minus its platoon commander. The 2nd paratrooper infantry platoon shoots at the Germans but causes no damage. It hunkers down readying for the incoming Germans.
The real action is to the east. The 1st paratrooper infantry platoon unpins and assaults the Germans in the manor house at the bridge. This is pretty bloody. After a few rounds the Germans are destroyed (5 stands) but the Americans have lost 5 as well. They take a morale check and pass (They are Fearless Vets, after all . . .), but now they are down to three stands and are led by the company 2ic. Still, the objective is now in their hands, and there aren’t that many Germans left.
The 3rd paratrooper infantry platoon tries to lower that number. They move up and take a bazooka shot at the StuG platoon leader, and show that even a bazooka can hit and destroy a StuG once in a while. They then try to assault the survivors, which doesn’t go as well. The two remaining assault guns kill three more US teams before the Americans break off. They have to take a morale check as they only have their platoon commander and one stand left, but they pass it. There aren’t many American teams left near the bridge, but there are fewer Germans. All they have to do is hold on and victory is theirs. Airborne!
 US 1st Paratrooper Infantry Platoon finally makes it to the bridge.


Bazooka fire eliminates a StuG.
Germans: Everyone moves towards the objectives in Cauquigny, but it doesn’t really matter there. There are no too many Germans for the remaining US paratroopers to do anything of importance. The Germans are unable to do anything but pin the paratroopers in the northern part of town. The bogged down tanks stay that way as the others move toward the causeway.
The StuGs move toward the bridge and assault the remaining paratroopers. The assault guns are confident veterans and should be able to do some damage, possibly killing enough Americans to force a morale check and keep the game running. Defensive fire doesn’t cause any damage as the Americans don’t have any bazookas left. The StuGs kill a team, but the Americans pass their morale check and counter attack with Gammon bombs. Snicker, snicker. Gammon bombs. Give me a break. Two smoking StuGs later, my last forces left to contest the objective are kaput and the Americans win again. I thought I might lose a StuG or not kill enough American stands, but to lose both of them to gammon bombs smacks of Tom Hanks shooting at Tigers with his trusty .45. It is a good thing that Herr General cannot be contacted. I hope he stays in Rennes.
 Last ditch effort: the two remaining StuG IIIs assault the Americans at the bridge.


Gammon bombs and good dice doom the German assault.
There aren’t too many Americans left at La Fere (only six stands of infantry including the Company Commander and the 2ic in charge of the 1st paratrooper infantry platoon plus the two surviving stands of the 3rd paratrooper infantry platoon), but it is enough. At least until 100. Panzer Abteliung gets its act together. Stay tuned for a counterattack.

 German reinforcements move up to counterattack the depleted US forces along the causeway.
LESSONS LEARNED:
- Fearless veterans are nasty, particularly in assault. You have got to use the indirect fire weapons to pin them and keep them that way, if only to keep them at a low rate of fire and unable to assault.
- Fire AND maneuver is important to win. Sitting in your entrenchments isn’t enough to seize the initiative and make the enemy react to your attacks.
- Gammon bombs can hurt. When do the Begleit Tank Riders show up?
 The Platoon Commander fo the US 3rd Paratrooper Infantry Platoon deserves the "Iron Mike" award for taking out a MG platoon, a scout platoon, and even a StuG III with a bazooka!
 Herr Leutnant receives word of a new target by his platoon observer teams.
  Eager German soldiers are happy to load the heavy bombs and send them into the Allied lines.
 Forward observer teams take advantage of the dense cover in the bocage.
  The full weight of a 120 mm mortar platoon is more powerful than a much more expensive Allied artillery battery.

 Peter Pig German observers and NCOs take advantage of Battlefront bricks to hide behind.


